Getting Started
This page documents the steps needed to run the Actuation demo with the Primary Compute on an AVA Developer Platform, connected over Ethernet to the Safety Island on an S32Z development board.
Note
All command examples on this page can be copied by clicking the copy button.
Requirements
Hardware
ADLINK’s AVA Developer Platform
NXP’s S32Z27x-DC(2) development board (S32Z)
NXP’s S32 Debug Probe
Note
The present instructions use the NXP S32 Debug Probe to flash the S32Z board. It does not follow the current public Zephyr instructions for the board (which use a Lauterbach TRACE32 debugger instead).
Software
NXP’s S32 Design Studio for S32 Platform (tested version: 3.5): needed for flashing the board with the S32 Debug Probe
S32Z setup
Hardware setup
Note
The S32Z board exists in two different hardware versions. Its Power Management Integrated Circuit (PMIC) can either be the PF71 or the PF5030, which implies different jumper settings. The variant of the S32Z board documented here has the PMIC PF5030 installed.
The jumpers on the board are on:
JP4     1-2
J13     5-6
J15     5-6
J19     5-6
J21     7-8
J23     7-8
J28     2-3
J32     1-3 2-4
J37     1-2 4-5 7-8 10-11
J38     1-2 4-5 7-8 10-11
J62     1-2 3-4 5-6 7-8
J65     2-3 5-6 8-9 11-12
J66     2-3 5-6 8-9 11-12
J68     2-3 5-6 8-9 11-12
J121    1-2
J122    1-2
J123    2-3
J124    2-3
J125    1-2
J130    2-3
J131    1-2
J132    2-3 5-6 8-9 11-12
J134    1-2 4-5 7-8 10-11 13-15
J135    1-2
J244    3-5 4-6
J247    1-2
J248    2-3
J249    2-3
The RCON switches are configured as (0 for OFF, 1 for ON):
SW4      SW7      SW5      SW6
00110000 00001010 00000000 00000000
The development board is connected to:
the network, through its Ethernet port
the S32 Debug Probe, through its JTag connector
a workstation, over UART, through its USB port (J119, not J137)
115200 of baud rate
prints the actuation commands generated by the application
the power, through 12V in
Software setup
Follow the instructions provided with the software listed in the Software paragraph to set them up.
Once the S32 Design Studio is installed, documentation for the S32 Debug Probe can be found under S32DS/tools/S32Debugger/Debugger/Docs from the root of the installation directory.
If the S32 Design Studio has been installed on a Linux platform, dependencies for running the debugger can be found in the “Installation prerequisites for Linux platforms” paragraph of the installation guide found under S32DS/help/pdf from the root of the installation directory.
In order to get support for flashing the S32Z board from the IDE, the “S32Z2/E2 development package” needs to be installed in the S32 Design Studio. This can be done from “Help” -> “S32DS Extensions and Updates” at the top.
AVA Developer Platform setup
EWAOL installation
The following instructions are derived from the EWAOL documentation.
Download and Build
On a workstation running Linux (validated on an x86_64 machine with Ubuntu 20.04 and 200GB of free disk space), install the build tools by following the Build Host Environment Setup paragraph of the EWAOL documentation.
Clone the meta-ewaol repository and checkout the kirkstone-dev branch:
git clone https://gitlab.com/soafee/ewaol/meta-ewaol.git -b kirkstone-dev
cd meta-ewaol
Build for the AVA Developer Platform with ~60GB of extra disk space:
EWAOL_ROOTFS_EXTRA_SPACE=60000000 kas build --update meta-ewaol-config/kas/baremetal.yml:meta-ewaol-config/kas/ava.yml
Note that at the time of writing, the EWAOL build was validated with:
meta-adlink-ampere   = "kirkstone:2cd61ca517a4866947d4a4d3dddcf93ce7be916f"
meta-filesystems
meta-networking
meta-oe
meta-python          = "kirkstone:571e36e20e9d1f27af0eb4545291beeb64f280e2"
meta-virtualization  = "kirkstone:dde0ff9eaa301ec5bd3daf667c7966cf55404d26"
meta
meta-poky            = "kirkstone:fa856e0dac16e13991561882bc6ad4c830674d78"
meta-ewaol-bsp
meta-ewaol-distro
meta-ewaol-tests     = "kirkstone-dev:7bcbb8483660256d61a76a584924145177ca3b9a"
Deploy
Follow the steps in the “AVA” deployment paragraph of the EWAOL documentation to flash the generated image onto the AVA Developer Platform, by following the “Baremetal distribution image” (non-SDK) choices.
Run
Login as ewaol.
X11 forwarding
In order to use the rviz2 visualization software with the AVA Developer
Platform when working over SSH, X11 forwarding needs to be enabled. To do this,
follow the steps below:
Get into an Ubuntu container:
docker run -it --name x11docker ubuntu:20.04
Inside this container, get the necessary X11-related packages:
Note
The following warning lines are expected: W: Download is performed
unsandboxed as root as file '[...]' couldn't be accessed by user '_apt'. -
pkgAcquire::Run (13: Permission denied).
apt update
extract_to="./xauth"; \
  pkgs=(libxmuu1 xauth libxext6); \
  for pkg in "${pkgs[@]}"; do apt-get download $pkg; dpkg-deb -x ${pkg}*.deb ${extract_to}; done
exit
Now outside the docker container, install the files from those packages:
docker cp x11docker:/xauth .
docker rm x11docker
sudo cp -rv ./xauth/usr/bin/* /usr/bin/
sudo cp -rv ./xauth/usr/lib/aarch64-linux-gnu/* /usr/lib/
rm -r ./xauth/
Identify the IP of the AVA Developer Platform with:
ifconfig enP4p4s0 | grep inet
Connect to the AVA Developer Platform from a Linux machine with (replacing ${TARGET_IP} with the actual address from the previous step):
ssh -X ewaol@${TARGET_IP}
Swap file
Some Autoware packages require a lot of RAM to build. Add 20GB of swap memory in addition to the 32GB of RAM with:
sudo fallocate -l 20G /swapfile
sudo chmod 600 /swapfile
sudo mkswap /swapfile
sudo swapon /swapfile
Actuation demo
Dependencies
Get into an Autoware development environment and setup the repository:
docker run -it -v $(pwd):$(pwd) -w $(pwd) --net host -v /tmp/.X11-unix:/tmp/.X11-unix:rw -v ${HOME}/.Xauthority:${HOME}/.Xauthority:rw -e XAUTHORITY=${HOME}/.Xauthority -e DISPLAY=${DISPLAY} ghcr.io/autowarefoundation/autoware-universe:galactic-20220915
git clone https://gitlab.arm.com/automotive-and-industrial/safety-island/actuation-demo.git -b v1.0
cd actuation-demo
git submodule init
git submodule update
Install dependencies (adapted from the Zephyr documentation):
apt update
apt install --no-install-recommends git ninja-build gperf ccache dfu-util device-tree-compiler wget python3-dev python3-pip python3-setuptools python3-tk python3-wheel xz-utils file make gcc libsdl2-dev bison unzip gpg wget
Add the Kitware APT Repository in order to get recent versions of cmake:
wget -O - https://apt.kitware.com/keys/kitware-archive-latest.asc 2>/dev/null | gpg --dearmor - | tee /usr/share/keyrings/kitware-archive-keyring.gpg >/dev/null
echo 'deb [signed-by=/usr/share/keyrings/kitware-archive-keyring.gpg] https://apt.kitware.com/ubuntu/ focal main' | tee /etc/apt/sources.list.d/kitware.list >/dev/null
apt update
apt install --no-install-recommends cmake=3.23.* cmake-data=3.23.*
Install Zephyr-specific dependencies:
pip3 install -r zephyr/scripts/requirements-base.txt
west init -l zephyr_app
west update
west zephyr-export
Zephyr SDK
Install the Zephyr SDK, which is required to build the Zephyr app (tested with 0.15.0):
cd /home/ewaol
wget https://github.com/zephyrproject-rtos/sdk-ng/releases/download/v0.15.0/zephyr-sdk-0.15.0_linux-aarch64.tar.gz
tar xf zephyr-sdk-0.15.0_linux-aarch64.tar.gz zephyr-sdk-0.15.0/arm-zephyr-eabi/ zephyr-sdk-0.15.0/setup.sh zephyr-sdk-0.15.0/cmake zephyr-sdk-0.15.0/sdk_version
rm zephyr-sdk-0.15.0_linux-aarch64.tar.gz
cd zephyr-sdk-0.15.0
./setup.sh -c -t arm-zephyr-eabi
Build
Build all the components:
cd /home/ewaol/actuation-demo
./build.sh
The resulting Zephyr binary is located at
build/zephyr_app/zephyr/zephyr.elf.
S32Z run
Initial setup
Copy the elf file generated at the previous step to the workstation where the NXP IDE is installed.
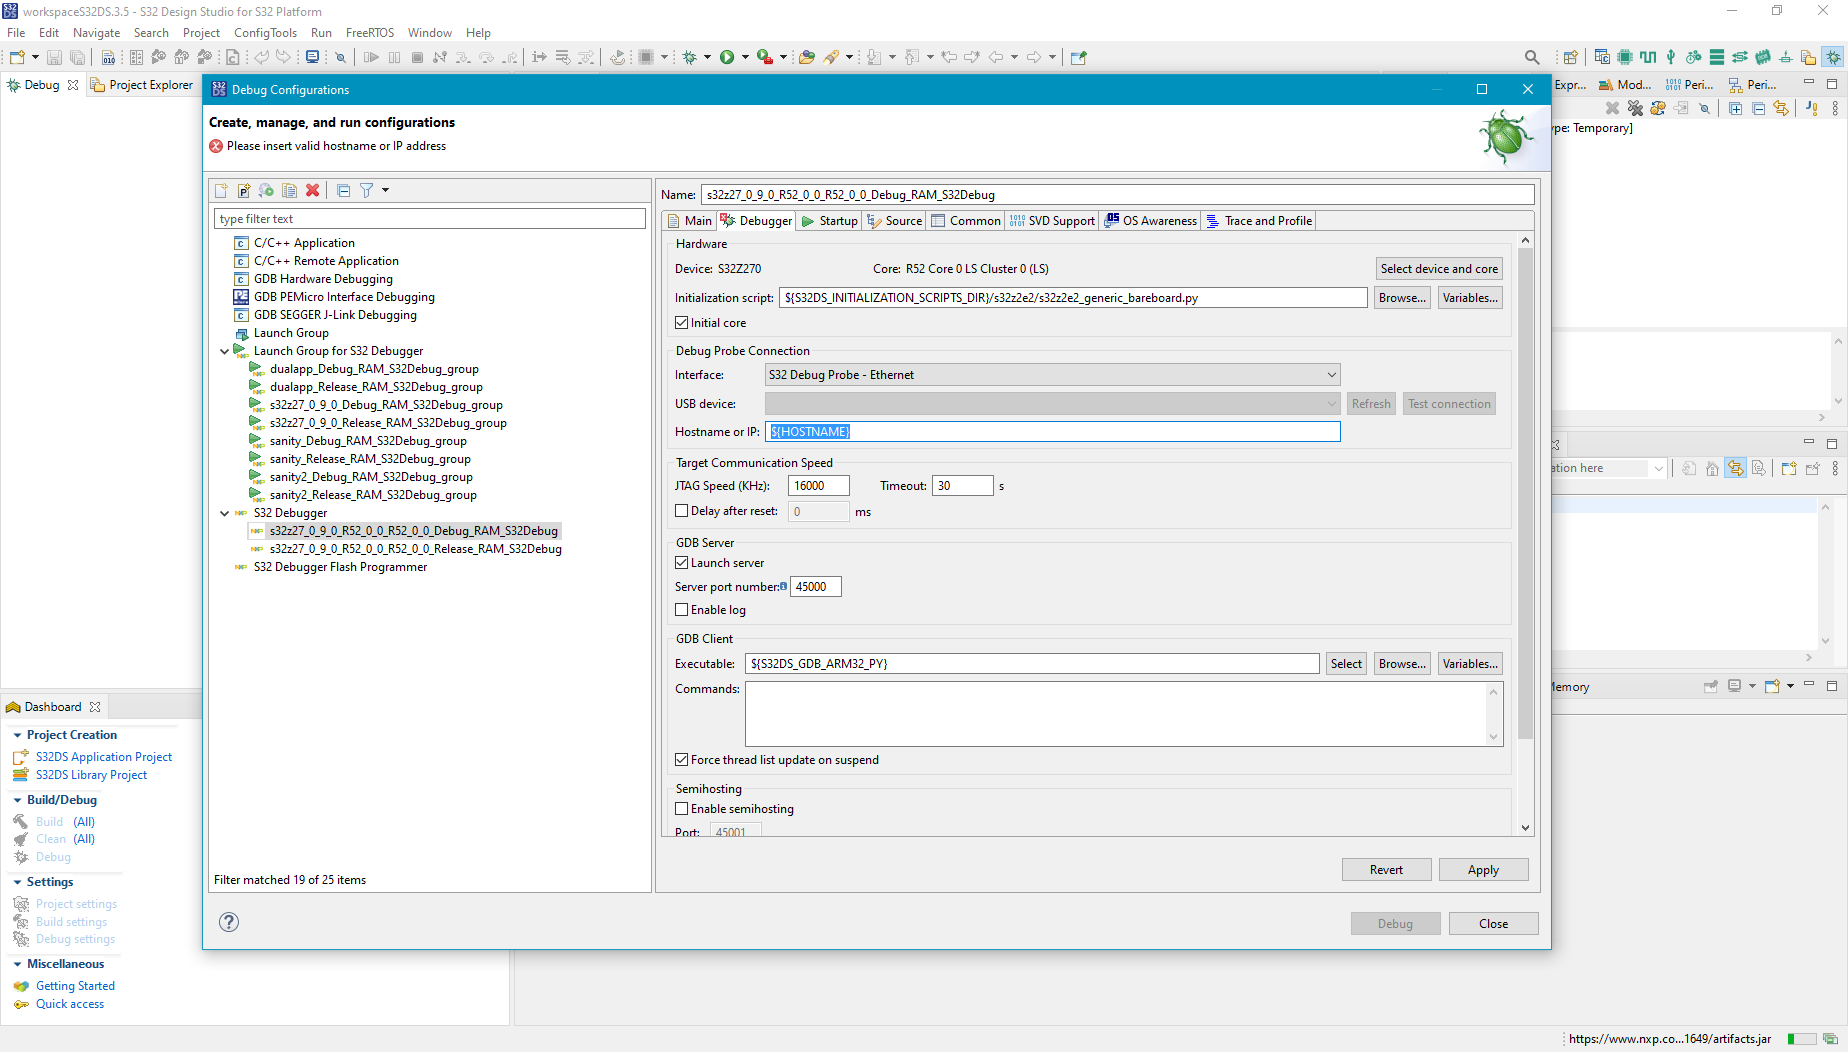
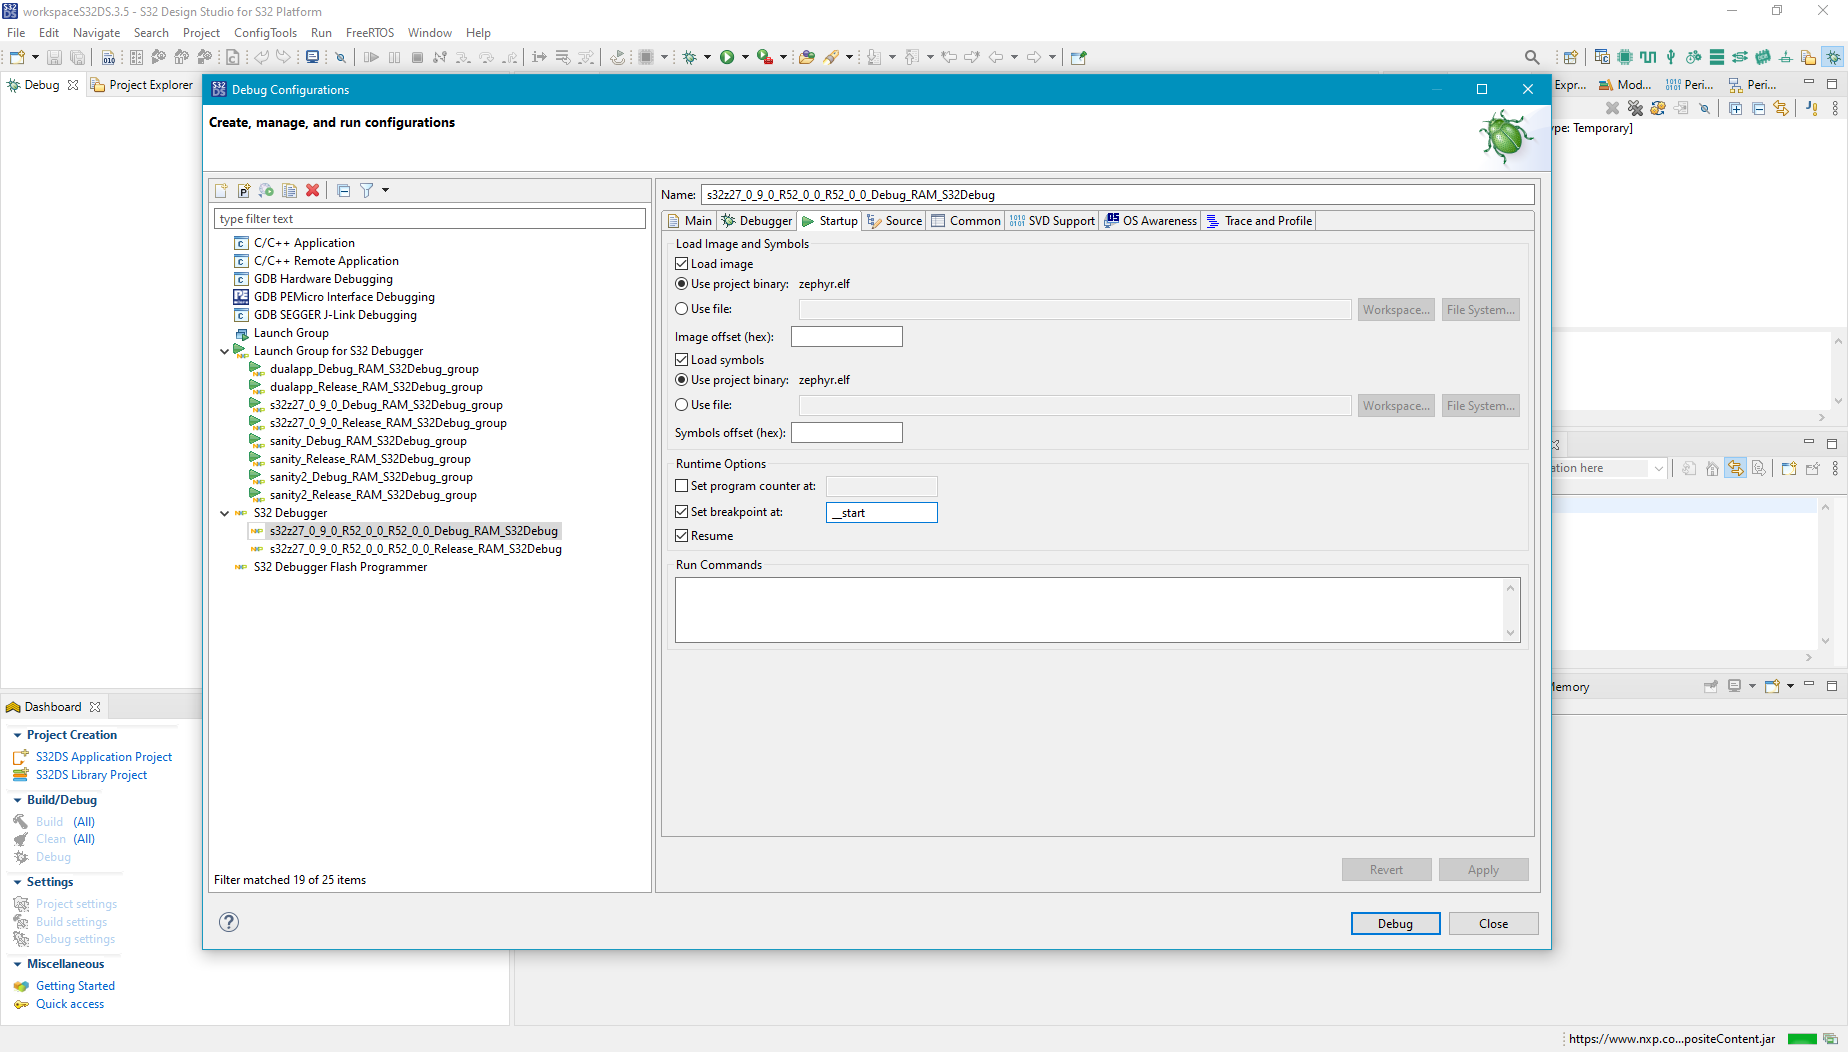
Create a new debug configuration (“Run” -> “Debug Configurations…” at the top ). In the settings:
disable auto-build and set the path of the file to the location of the copied elf file
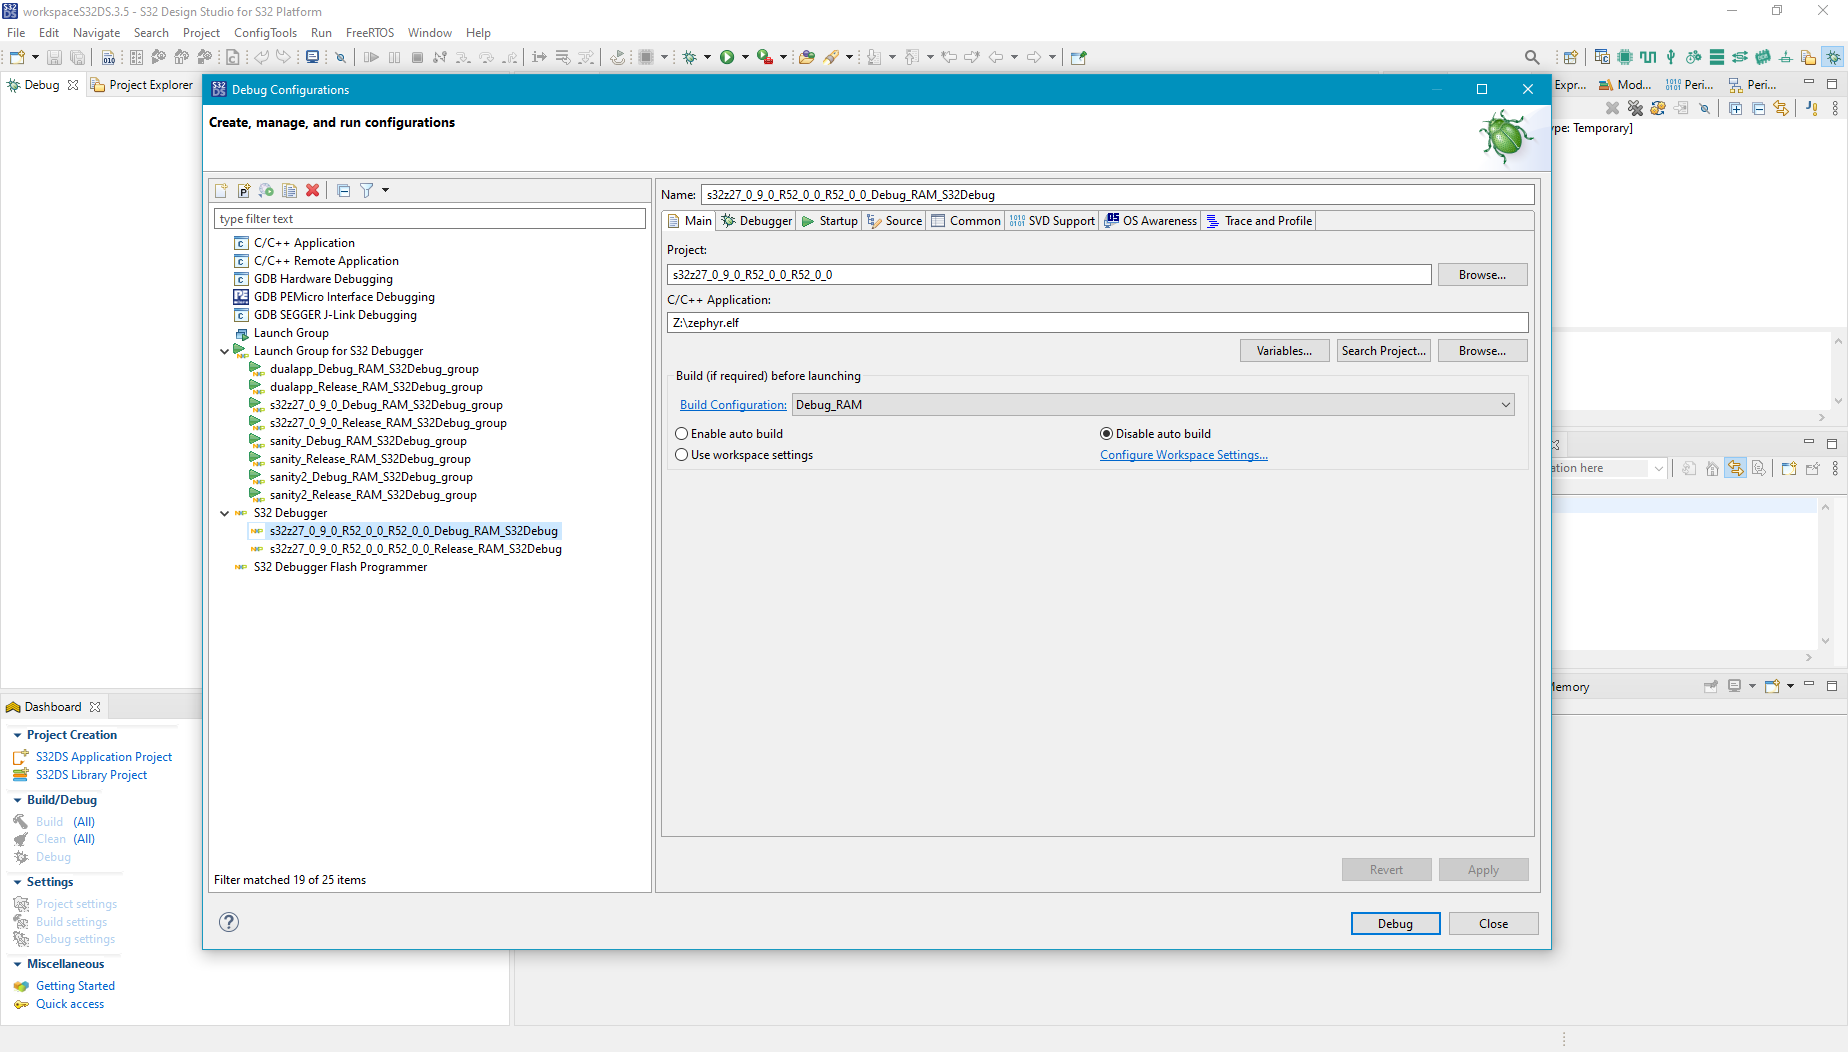
change the debugger settings to match the actual setup
change the default breakpoint from
mainto__start(with two underscore characters).
Note
The NXP S32 Debug Probe is not officially supported by NXP to flash their S32Z board. A workaround is needed to have the Thumb mode aligned between Zephyr and the CPU it runs on.
Flash and run
Click debug to flash the board. When the __start breakpoint is reached,
click on the “Arm System Registers” tab (which may alternatively be located on
the top right panel) and locate the SCTLR register. If the “Arm System
Registers” is not present, you can add it in “Window” -> “Show View”.
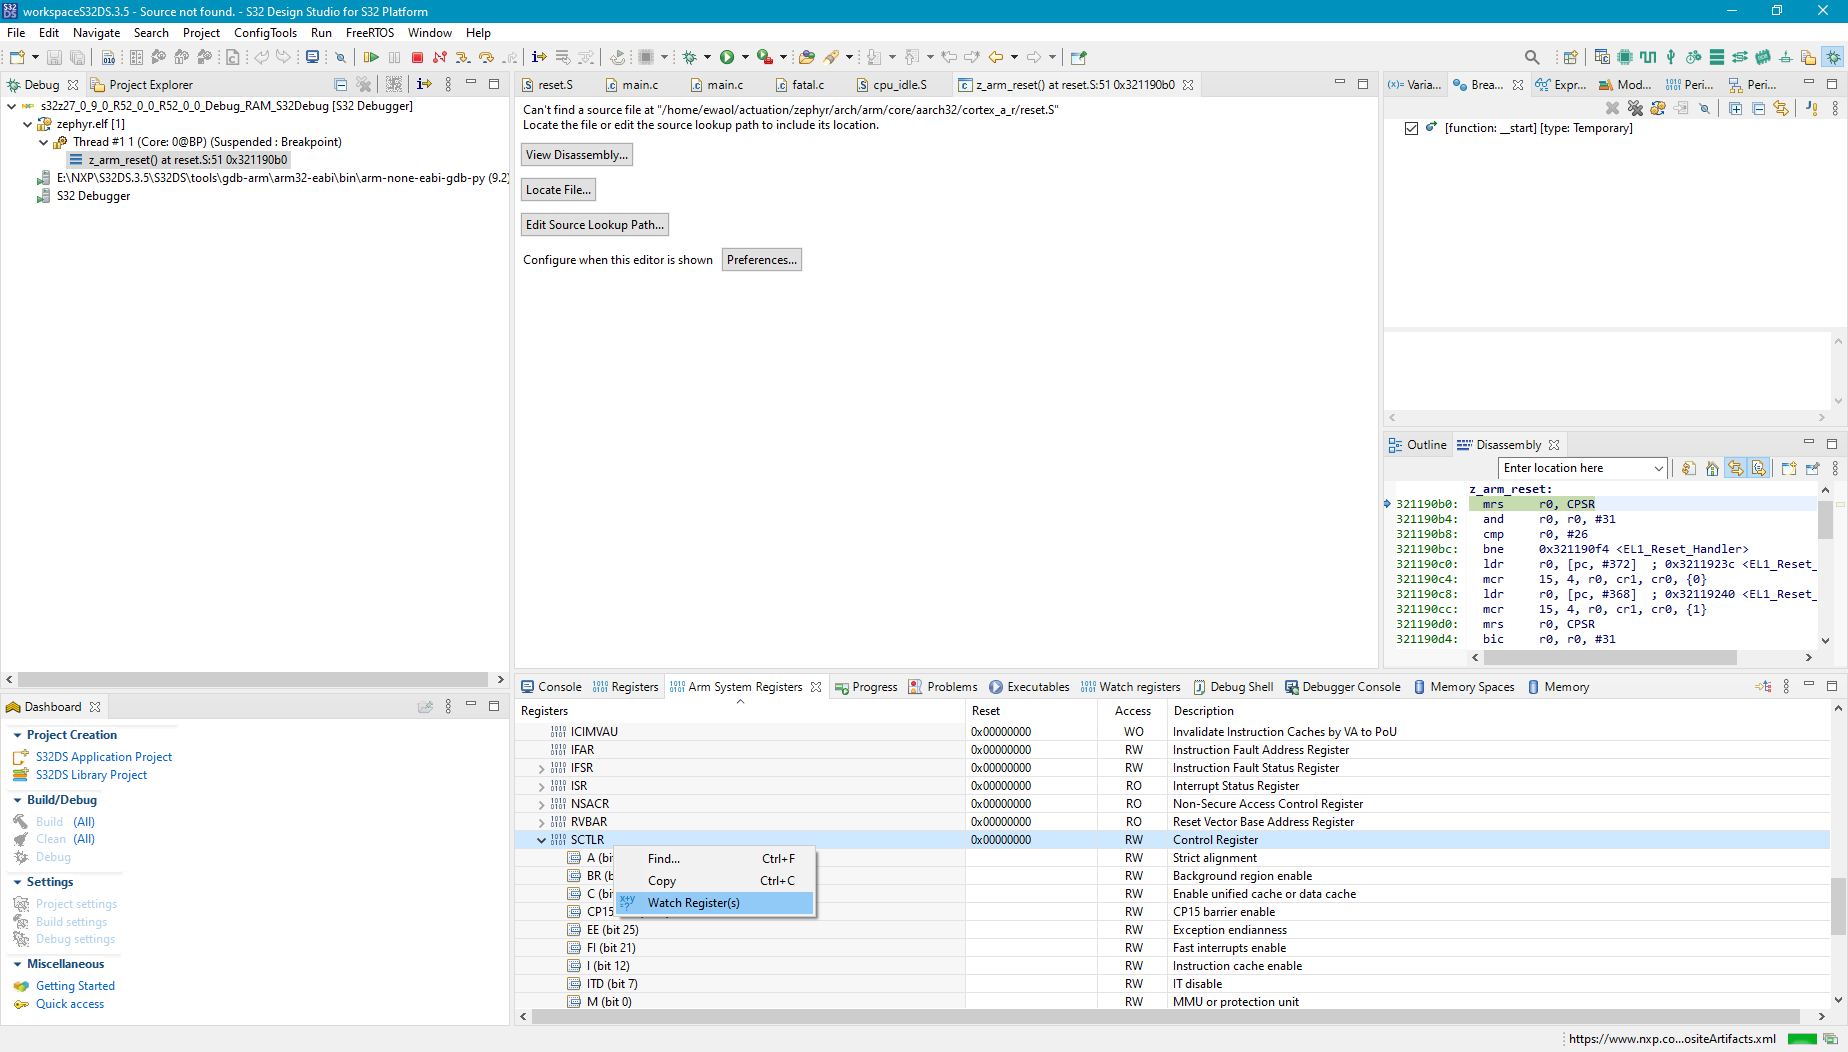
Watch the register, and in the “Watch registers” tab change SCTLR.TE from 1
to 0.
Resume execution.
AVA Developer Platform run
On the AVA Developer Platform, inside of the previously created docker container, setup the execution environment:
cd /home/ewaol/actuation-demo
source install/setup.bash
export ROS_DOMAIN_ID=2
export CYCLONEDDS_URI=$(pwd)/cyclonedds.xml
Note
This ROS Domain ID is expected to not be used by other machines on the sub-network.
Setup the demo by following the Preparation paragraph of the Autoware documentation.
Run the demo with:
ros2 launch actuation_demos planning_simulator.launch.xml map_path:=$HOME/autoware_map/sample-map-planning vehicle_model:=sample_vehicle sensor_model:=sample_sensor_kit
Note
Periodic error logs are expected from this command.
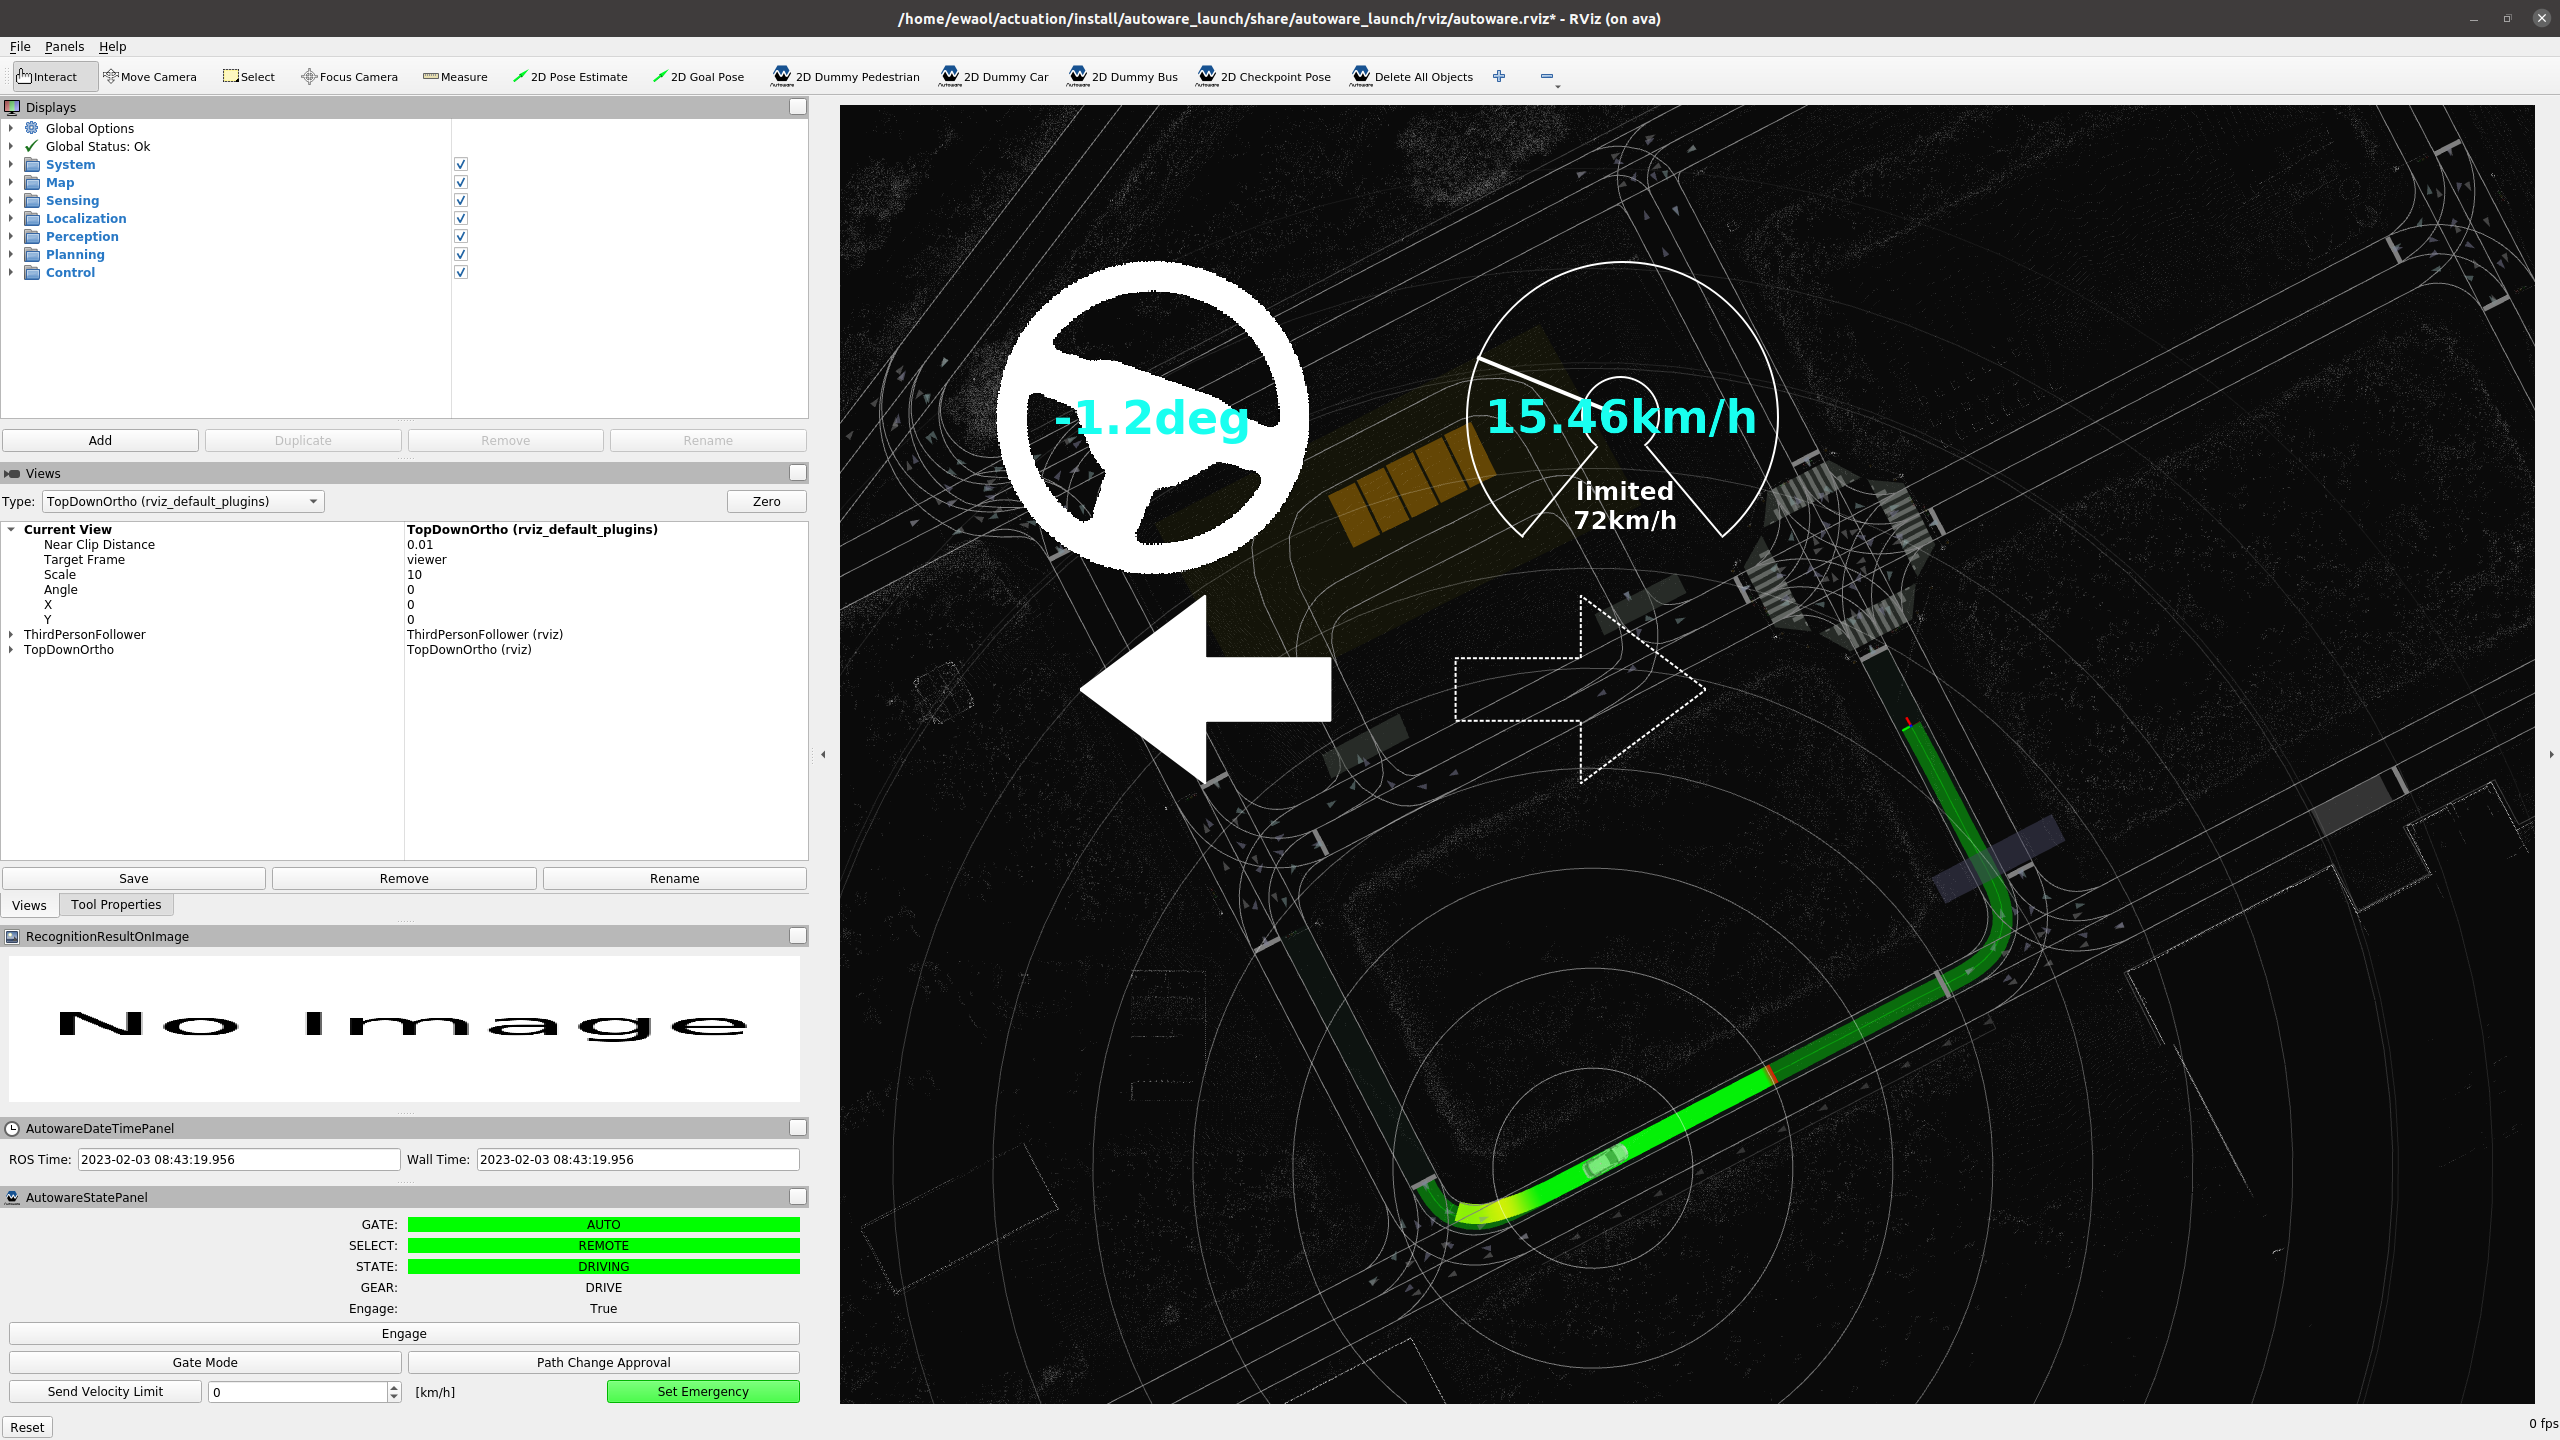
By default, it launches rviz2 for visualization.
Follow the steps 2 to 5 in order to interact with the simulator and run the demo.
This is the outcome when driving the car (using X11 forwarding makes the steering wheel overlay oversized):
Warning
When terminating the Autoware pipeline on the AVA Developer Platform, the Zephyr application will become unreachable. It is necessary to re-flash the board with the same binary in order to run the demo again by following the Flash and run paragraph. See the Resolved and Known Issues for more details.